Source of the detailed specs and details (including pictures) – Accredited to Aprilia.
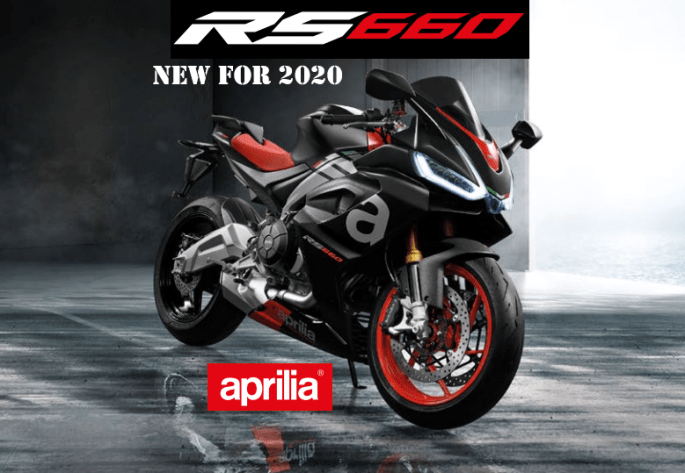
Aprilia are selling this machine as ‘a new concept in sport bikes”.
So what is it up against!? When I first saw this, I was thinking it ‘looked’ like competition for the new Ducati V2 , but the V2 will have around 155hp from a 955 engine. From a power perspective, this is closer to the Ducati Supersport S with 110bhp but that machine is around 10- 15kilos heavier and it is aimed more a sports tourer rather than a straight sports bike.
(I thought I would mention the comfortable Ducati Supersport because in contrast to the “sports bike” mantra that Aprilia talk about for the RS660, they also mention that the riding position has been designed with comfort in mind with its generous seat, foot pegs that are not too high and semi-handlebars mounted on top of the upper steering yoke!) Interesting .. so this a true sports bike – but with real world road usability…but can we really have both, I hope so! 🙂
Most of the current crop of new bikes with similar performance and power levels, are naked, which is why I think that Aprilia may hit some gold with this machine. I’d suggest some of the competition will include the 2020 Ninja 650, the 2020 Suzuki GSX-R750 and stunning 2020 Yamaha YZF-R6. I’d love to know what you think would be it’s medium capacity sports bike competitors (ie not naked machines). Visit our Facebook page and join the discussion!
The RS 660 is all about its new engine. We’re talking about an extremely compact latest-generation front-facing 660-HP parallel twin-cylinder, with Euro 5 certification. Derived from the V4 1100-cc, its configuration was chosen for its compactness and efficiency, reduced heat transmission and the freedom it offers for optimising space to create a lightweight, sleek frame.
The structural characteristics of the fairing are unmistakably those of the Aprilia V4, with the front light triple-LED configuration and its DRL lights clearly distinguishing it as the RS 660. The double fairing serves as an integrated aerodynamic appendage,.
Aprilia RS 660 is presented in two graphic versions: the first clearly dominated by colours that represent the history and sports heritage of Aprilia. The second (my favorite!) is a black look on which the numerous bright red details make a real impact.
The sections below are just a simple overview of how the build progressed – including the major things that I learnt along the way.Visit and Like our Facebook page if you enjoy motorcycle related content!
Before I take you with me on this adventure – I’ll give you my ‘up front’ check list for any Cafe Racer build! Numbered below is a shortlist of a few things I have learnt from my first time on this journey. I will definitely try another build (maybe soon so watch this space) but the points below would have really helped me if I was starting out on this process again!
Buy a ‘runner’ with all parts of the original motorcycle actually ‘on’ the motorcycle if at all possible. Buying a motorcycle that comes in parts is asking for trouble – there’s no way to tell if all the parts are there and no way to tell if the engine is in any way good. Even if you plan replace all the parts – I found that I learnt a massive amount from taking the old pieces off!
Do not under estimate the time commitment required. I worked at this project every other night for around a month and a half, I was organised. (This was not just a ‘cosmetic’ build – see details about the gearbox and cylinder heads below!)
Be sure that your base bike is ‘common enough’ that there are plenty of ‘retro fit’ parts or breakage parts available (search eBay before you buy the base motorcycle to check that there is a good number of listings that at least mention your prospective machine)
Check the gear box, and examine the smoke from a cold start. Unless you are a up for a really big challenge make sure the gear box is running cleanly up and down all the gears. If the exhaust smoke is blue – you’ve maybe got oil ingress issues coming into the combustion cycle – which means at the very least you ‘could’ be looking at a top end tear down and rebuild. White smoke more often indicates water ingress, a fueling issue, air / carb issue, whilst black smoke can indicate similar issues as above or compression problems: the combustion cycle and associated pressures may not be burning the fuel efficiently.
Create and stick to a budget! After you’ve built a really neat budget, with lots detail , take the total and add 20% : I promise you the project will overrun. The biggest mistake I made when it came to budget considerations – was not considering I might have to buy lots of additional tools which I did not already have in my arsenal – a Torque Wrench, a Feeler Gauge..do you think you’ll need a Carb Balancing Kit?
Buy the Haynes manual– please don’t even hesitate on this one – especially if you’re delving into the engine. This was my bible for this build!
Keep your work-space tidy and organised. When you take pieces apart – either tag them – or set on a piece of paper or cardboard underneath them – write a note about that part on the paper to help in future reassembly.
Have a vision! Be sure you know roughly where you going – things will change along the way but it is important you have an end goal for your newly created machine. Use Pinterest to create a board with images of inspiring examples to get the juices flowing. Check out our Pinterest Boards when you are on there!
The story begins with bargain!
I set my bike budget at just £500, and gave myself £400 for the rest of the build. I did some research and decided a Honda CB250 model circa 1980’s would be a good option. I watched a few of these come and go on Gum-tree / Craigslist / Ebay… BUT.. I was patient. Then one Saturday morning I saw a 1980 Honda CB250 Superdream come up for just £250!
Yes, it was too good to be true – it looked stock (and ‘restored clean’) in the pictures but….
It was running very very smokey (I mean – I couldn’t see the Sun after starting it). The gentleman who was selling it had tried to solve this himself and bought a couple of separate engine heads – but he just didn’t have the time to investigate or put the time into swapping out an alternate head for the existing one.
Sadly it wasn’t the back tyre causing the smoke on my Honda 🙂
The second, and main issue, was that the 2nd gear was ‘lumpy.’ While it shifted into 2nd OK – it made an awfully unpleasant notching & grinding noise. The other gears appeared fine, and the clutch engaged OK, but something was very wrong with the gearbox.
As well as the spare engine head unit – the seller had also sourced a reclaimed gear box from eBay – but again he simply didn’t have the time to do a full engine dismantlement and reassembly. The bike had been sitting in his shed for years – an abandoned project.
If I bought this – I knew I was in for a full engine dismantlement and reassembly – and all of this on top of the other ‘Cafe Racer’ modifications and additions I wanted to do!
In hindsight – as per my ‘list’ above – I would definitely look out for a more mechanically sound engine, as per my list above!
So, with almost zero mechanical experience (but a willingness to learn) , I paid £250 for a running (very very smokey) Honda CB250 SuperDream, with most of an entire spare (used) engine thrown in!
Just a note : the story and images here are a not a full guide on how to build a cafe racer – it is just a short insight into SOME of the trials , tribulations (and fun!) of my journey, but I hope you have fun reading it!
Now, while I highly recommend the Haynes Workshop manual – it still takes a lot of mechanical common sense to tackle something like this. When it comes down to it – you basically have to start unscrewing things and stripping the thing apart.
I bagged and tagged sets of screws and bolts as I went: in fact I put everything I removed that was small enough into bags, my advice is to write a note on the bags to tell you where the parts inside belong! (Even make a note of the Haynes page and paragraph you are on!) This little bit of extra time and care taken ‘up front’ really saved me a lot of pain when it came to reassembly.
So here we go!
The first job was to get the engine cleanly removed from the frame! This took me about two nights & an afternoon. The process of engine dismantling and rebuilding (which follows below) was a fantastic learning experience that I recommend to anyone interesting in motorcycle technology. My Honda CB250 Engine – ‘on the bench’. (The little box of sockets in the picture are one of my favorite pieces of kit – you can pick them up from amazon here) Here we see the rocker mechanism after removing the cover : the springs you can see sit on top of the valves, keeping them closed. [When putting the engine back together this is the stage where you set the ‘valve clearance’ gaps using a feeler gauge.]
The rocker arms ‘rock’ back and forth pressing the valves open / closed in a sequence which is regulated by the timing chain at the center of the picture. The clearances between the end of the arm and where the arm presses on the values to open them, are adjusted by the lock nuts you can see at the end of each arm. Many older motorcycles and some new dirt bikes and trials machines still require frequent valve clearance checks.
There was so much to learn at this point, and I was only at the very beginning of the dismantling process! Please understand that I’m writing this article as if you’ve not seen inside a basic motorcycle engine before – I am deliberately just giving you ‘a flavor’ by covering some of the technical terms you’ve maybe heard mechanics talk about before! This is the ‘nut of the devil’ otherwise known as the clutch hub lock nut. It was one of the most challenging parts of the whole disassembly! I fashioned my own clutch nut removal tool ; which I would NOT recommend – just buy one.
While the Haynes manual did a good job explaining how to make a home made a lock nut removal tool – the job of actually releasing the lock nut was awful. I still have nightmares. A ‘few’ nights later – the picture above shows the internals of the lower half of the engine exposed. You can see the second gear cog has a tooth missing! [The cog closest to the right of the picture]. Problem identified! The spare engine components thankfully included a spare set of gear cogs – but these things can picked on up from eBay fairly easily. You can also see in this image the gear change barrel – when it rotates, it causes the gear selector forks (which sit in the deep groves of the barrel) to get moved back and forth, translating the sequential up & down movement of the input foot lever to the transverse movement of the forks along the axis of the gearing. Fascinating! (Well I thought so!)I began the painting a little early (with heat resistant engine paint of course!) then realized I had neglected to swap out the head unit! (So another few nights later, after having to buy more gaskets, the new head was attached and the engine above was almost ready (again). I spent a considerable time reading and learning how to strip back and then how to paint a tank. Here are some my biggest learnings to help you if you tackle a project like this! 1. You can use spray cans (that’s what I did) – but yes, using a compressor and sprayer will be a better job. 2. Sanding down to using (eventually) a super fine wet and dry grit to achieve as good a surface as possible, is the absolute key to the final finish looking good. The final paint finish will only ever be as good as the preparation to the surface you have put in. Don’t skip the primer (and don’t skip recommended number of coats). 3. IMPORTANT – Be sure to buy a proper petrol proof lacquer. The first lacquer I used was labelled ‘automotive’ – when I splashed a tiny drop of petrol on the tank (the first time I was testing the bike fueling) – a bubbling paint blister greeted me. Yes – I had to paint the tank again.
Next time I would definitely consider either buying a ready painted tank or paying for a professional to do this – but it IS possible for an absolute amateur (like you or me) to get the job done!
I tried to create my own seat from the existing one – to cut the story short – I simply was not happy with it. A £20 eBay cheap option came to my rescue, or so I thought! The universal eBay cafe racer seat I found – wasn’t really universal but I expected that! I had to work through a considerable amount of inventive fabrication to get the new seat (the one you can see in the final pictures) to fit. The challenge was getting it to mount with lock nuts flush to the tank and frame. Overall this was one of the most time consuming and challenging pieces of the build. (I spent longer adjusting and getting the eBay seat to fit than I did in fabricating my own seat that you can see in the images above!)Cleaning the covers brought me the into the entire new “world” of metal polishing techniques. I’ll write a blog post on this some day. Again – preparation of the surface is key. I did buy a cheap set of metal polish attachments for my drill (and the multi-tool was also invaluable). Again – I could have spent another month getting the metal work to shine like like sun – but I wanted to it be good, rather than perfection. The image of the covers above is before treatment. The image below shows carb covers, before, and then after a little work with a polish kit. I then finished off to a reasonable finish with Autosol metal polish, amazing stuff.
I have only a few photos of the carburetors ‘mid-build’. One of the keys was buying a good Carb cleaner (basically – petrol based solvent!) to ensure that all parts were thoroughly cleaned. If you have a pressured air gun- use it here. Check that your diaphragms are in good order – if needed just replace them when the part is in pieces!
Carburetor valve setting and needle adjustment is another entire area of study and learning – I’ll not go into it here! If your other half has an ultra sonic jewelry cleaner – this is a fantastic use for it! Strip down everything on the carb and pop the pieces in there! You can pick up these ultrasonic baths easily from Amazon!
I also bought a carburetor balancing kit – difficult to use (you’ll find some instructional videos on YouTube) : this is the one I bought here! [A balancing kit is effectively a vacuum strength measurement device – it gives you a reading which allows you to set each carburetor’s intake to develop the same level of base vacuum draw in each cylinder. ] I’ll maybe write a separate blog on to give some information around carburetors at some point!
You can see here I tried to paint the springs using a rubberised paint. I didn’t like the finish – it was a very dull matt. Instead I was able to pick up brand new replacement rear spring sets for £30 or so. I’ll mention here that I also had to learn how to replace front fork seals! Surprisingly not one of the most difficult jobs of the build – just follow any online YouTube tutorial and be brave! (Or, like and follow our Facebook page to contact me if you want to know more!)
I also sourced a ‘seat hoop’ from eBay (the metal hoop you can see in the image above at the back of the bike). I got the old frame chopped off and the new hoop attached after some basic trial and error! (I used an arc welder for this – which was much too strong for this delicate thin metal – but with some perseverance and a few prayers, it held)
When it comes the electronics – take photos of everything for reference, BEFORE you take the parts off the bike. I also marked each wire (if I couldn’t get a permanent marker onto the clips – I used a piece of masking tape.)
I labelled each side of each connection where there was clip joint, starting 1 – 1 ,then 2 – 2 , 3 – 3 , etc , etc. Using the same number on each side of broken apart clip. A voltmeter is also invaluable for tracing wiring connections and for testing when you’re swapping in new electronic components later in the build. Challenges for me included mounting the electronics board – I had to build a new ‘cradle’ beneath the seat (as opposed it being mounted on the side of the stock machine. I also realised late in the build that I needed an updated indicator relay to cope with the new lower voltage indicators I had bought! (Without the impedance provided by the new the relay – the newer indicator lights flashed much too quickly!)
I decided to use the existing speedometer and tachometer. I mounted the old units inside a shiny chrome cover (from China Ali-Express!). Of course nothing fitted as it should have and I had some serious work to get the units to fit in place neatly! Next time – I’d consider buying new dials instead of reusing the existing units.
The paint I used on the rims was a rubberized hard wearing compound – designed to resist stone chips etc. Spray can paint proving its worth again (just be sure to apply even, multiple coats , do not rush, avoid the dreaded runs!)
The Finished Machine – time for a race to a cafe for a coffee.
There was a considerable number of other challenges to get this bike through a UK MOT service and fit for the road (many of which I haven’t even mentioned in the above summary article!). It still had a few niggling issues when I sold it unfortunately – but I was upfront with the buyer that it was still facing some issues.
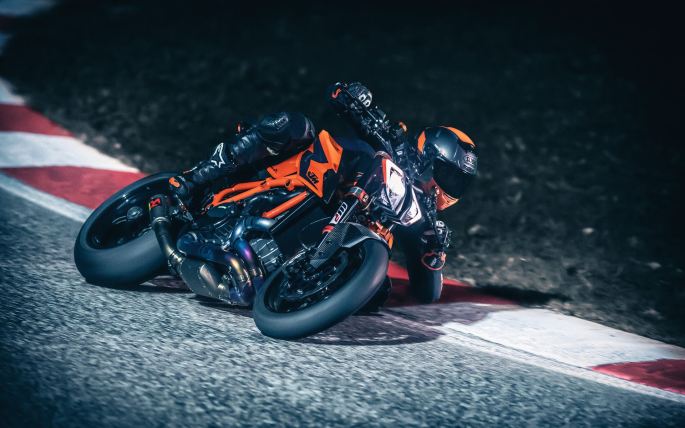
The KTM 1290 SUPER DUKE R has been ‘re-Beasted’ for 2020. KTM’s flagship bike has won rave reviews by catering for the preferences and skills of a vast range of motorcyclists and has undergone its most radical re-invention yet for 2020. A completely new chassis, styling, and electronics mean the KTM 1290 SUPER DUKE R has trimmed weight across the board, while a reworked LC8 engine has unleashed even more power.
While the ‘hornet like’ looks of the Super Duke will always divide opinion, it will be undeniably an angry stinger of a machine ride.
Power? (Look at that torque figure!)
So on that ‘reworked LC engine’ – the message from KTM is , “If it ain’t broken, don’t fix it” so the V-Twin from last years model is back, but it is meaner. Boasting 177 hp and 140 Nm, the 1301 cc LC8, V-Twin has undergone a subtle development. Optimized to be lighter but retaining its torquey character.
So we know it’s going to be blisteringly fast but what about stopping power?
FRONT BRAKE – 2 x Brembo Stylema Monobloc four piston, radially mounted caliper (320mm) REAR BRAKE -Brembo twin-piston fixed calliper (240mm), brake disc ABS -Bosch 9.1MP 2.0 (with cornering ABS)
On the electronics side of things you get a host of premium features – any top line hyper naked machine being released for 2020 should be expected to come almost ‘as standard’ with a host of riding modes – and the Super Duke is no exception! The Duke comes with , Rain, Street, Sport and Track Mode (which allows the rider to customize a few features to best suit their riding style, like the level of slip allowed by the traction control, plus anti-wheelie can be switched off..). Other goodies include Cruise Control and Tire pressure Monitoring and auto-cancelling turn signals.
KTM Press Release Image
The real question is, if you already own a Super Duke should you upgrade? If you’ve the cash and still love the Duke – I think its certainly worth considering .. because they are hitting this new model where it matters, it not just cosmetics! Slightly more power, a lighter machine , a new chassis for improved handling and new electronics package – that would be enough to pull me to towards the 2020 model. Though if you do not have the cash saved up for an upgrade, all the pre-2020 models are still offer fantastic experiences; the Super Duke’s have always been, and always will be, the definition of a hooligan machine.
At the time of writing prices start a £15,699 in the UK – so a premium price tag as expected – but KTM have thrown everything at this machine.
I hope the enjoyed that quick round up this new machine, Ride Safe, Ride Smart.
Smart Motorcycling Guide
For more news about the KTM 2020 model range please visit www.ktm.com or your nearest authorized KTM dealer.
Admit it – there’s something very satisfying about cleaning machinery…working hard to reveal the mechanical art obscured by grime and filth. Sometimes, I love cleaning my motorcycles – because you get see that mud covered monster emerge as a it once was, rising like a metallic phoenix from underneath the obfuscation of oils , to be reborn, shiny, clean and free. Ok – I’m going overboard – but it will definitely give your day a boost : clean your bike, and feel that pride of ownership coming back. 😎
Just be clear before we continue, cleaning and lubricating your chain is more important than any of the general washing below. I would recommend, you inspect, clean and lubricate your chain at the very least once a week. A natural time to do so is when you are cleaning the rest of the bike. Be aware that when washing the rest of your bike the water & soap you use can strip off your chain lubricant anyway, so this definitely a good time to reapply. Look out for a separate article coming soon with some guidance around how best to inspect, clean and lubricate your chain correctly.
Preparation
Get your bike onto a piece of ground that you do not mind getting some muck / oils onto (or put down some ground protection). Get the wheels on paddock stands / center stand. (Obviously not required – but extremely helpful to get around those wheels and the chain).
Make sure the bike is cooled down – soap on a hot bike (or on hot chrome) can do strange things.
Get your cleaning products laid out and within easy reach – simply so that you are not running back and forward to the shed, it sounds simple , but it really does the whole job much less of a chore.
If your bike is really really muddy – give it a quick once over with the sponge/soft brush and just some warm water. When done – refresh your water bucket, and measure out the required amount of soap as directed on the bottle.
Start working down from the top of your bike, downward. Do this in a logical fashion, finishing each item ‘as a whole’ before moving to the next. I usually do things in the same order every time so that I do not miss anything. I usually start with the tank, seat, under seat, handlebars, any plastic fairings, engine / engine covers, lights, then other exposed areas, finishing on wheel rims.
Be gentle around the radiator – you can use thesoft brush, to dislodge those bugs, but you want to take care not to be bending fins or puncturing the mesh. Try to not get soap and cleaning products on your brakes discs or calipers, a quick wipe with just warm water is often all that is needed, be sure to rinse off any soap that does get onto them.
As I mentioned above, I’ll write a more detailed article on chain care separately- but please do make sure you clean it thoroughly , using a proper chain cleaner product (and these cheap chain brushes are awesome), spend some time here: chain care is an important piece of maintenance, this is much more than just cosmetics.
This cleaning method that I am describing here is deliberately quick, because one of the main reasons we (myself included) let our bikes go unwashed for so long is that we take so long over the process of washing them. We do not want to give up two hours of our Saturday morning to wash a motorcycle when we could be riding it! I treat washing my motorcycle like a race – start a timer & see how fast you get this done! From start to finish I can get a really thorough wash done in 30 minutes. (On the other hand there are definitely some riders who enjoy the whole process and find it therapeutic to take it slowly – which is great !)
After you’ve soaped down, agitated, and dislodged all the dirt and grime – get the garden hose and gently rinse the whole machine. Get a dry chamois (clean with no grit!) – and give the whole bike a quick rub down to dry off the most of the remaining water – start with the tank in case you pick up grit on other parts.
I’ve had great success using a bike dyer (or if you have a leaf blower, or compressed air) to be sure that you are getting all the little difficult to reach places dried out thoroughly.
If you want to, you could wax the paintwork, it’ll add extra shine and protect the finish – consider polishing the chrome too, but use the specialist chrome and metal polishes for the job. Titanium pipework can also be a little temperamental (when titanium it heats up – some patterning can occur where residual surface oils and products can leave marks) so be sure to wash off all that excess soap and do not use your ordinary bodywork polish on those areas.
Consider applying a protective coast of ACF-50 – an anti corrosive I use on everything – originally developed for the aerospace industry – this is amazing stuff.
Let the engine run for 5 minutes and if you can to go for a quick ride to help blow out any remaining moisture that hasn’t already been removed.
Can I use a power/pressure washer or jet washer?
The short answer is yes – if you use common sense. Turn the power pressure down to the lowest setting, do not concentrate the jet on anything that resembles a seal, a bearing (like a wheel bearing) or is an electrical item. Again, for me, it is more bothersome and hassle to get the pressure washer rigged up – which might put me off getting starting the job at all!
Enjoy your clean machine, make sure you get out there and get it good and dirty again as soon as possible.
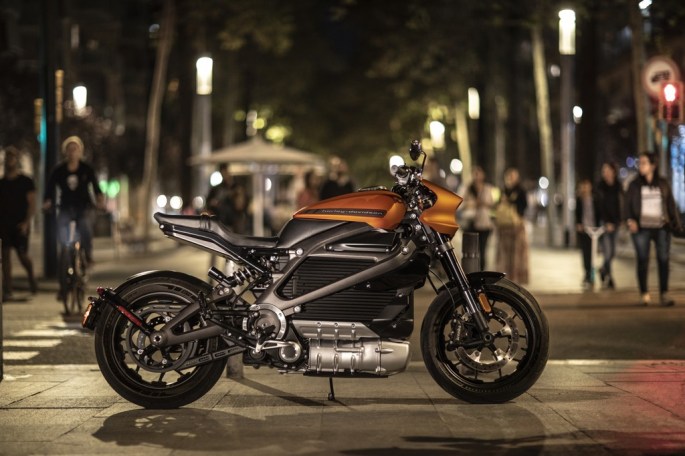
LiveWire! – the first ‘electric’ Harley Davidson! What makes a great electric motorcycle? The same thing that makes a great petrol powered motorcycle! How about 0 to 60 mph (0 to 100 kph) in 3.0 seconds and 60 to 80 mph (100 to 129 kph) in 1.9 seconds. Read on!
No thanks, I need petrol.
Before we continue, we know that there will be some of you thinking that an electric motorcycle is too futuristic and too different from what you are used to, and that it is impossible to really imagine owning or riding one. What I would suggest is when you strip it back, these things still have a big powerful motor (instead of an engine) and instead of a fuel tank, they will have a battery. We are not looking at some kind of hoverbike powered by nuclear fusion – they are simply motorcycles, powered by electric. So if you love motorcycles, give these early electric motorcycles some serious consideration as you might be riding one in a few years time! [Don’t get me wrong – I will always love the noise, the rumble (the smell!) of petrol engines but that is not going to stop me giving something new a try!]
Does it make you feel good and does it put a smile on your face?
Harley Davidson is a premium manufacturer – they simply do not make cheap / affordable machines, they aim for a premium quality look and feel and use that to define what the brand Harley-Davidson product stands for. So yes, I’d say if had one these beauties sitting on my driveway I would have a smile on face for sure. (And from the way theses things move (see performance figures below!) – I’ll have a smile on my face when I’m riding it too!)
Harley have chosen to focus their styling cues around the electric motor. Just as the combustion engine is the most eye-catching element – the crown jewel – of most non-electric motorcycles (especially cruisers), Harley have built a bright case and designed a mechanical, muscular shape is meant to convey power: I think it really works, it looks good! The cast-aluminum case has highly styled cooling fins with similarities to horizontal cooling fins on an air-cooled engines of old.
The tone of this paint finish gives it the look of anodized metal and is available in two exclusive colors: Yellow Fuse, and Orange Fuse, which is clearly been chosen by Harely to reflect the futuristic electrical technology, they wanted something different, eye catching, futuristic and modern. (Though wisely there will also be a model available in ‘Vivid’ Black)
Does it ride well for what you plan to use the machine for..but is this thing fast?
With instant torque (like any electric powertrain) hammering you, the LiveWire delivers acceleration of 0 to 60 mph (0 to 100 kph) in 3.0 seconds and 60 to 80 mph (100 to 129 kph) in 1.9 seconds. So yes, this is a blisteringly fast motorcycle. Because maximum torque is always on tap, roll-on acceleration for passing from any speed is outstanding.
Electric power-trains requires no clutch and no gear shifting, but you have the effect of engine braking by the power regeneration mode kicking you back as it adds charge to the battery, especially in urban traffic that often requires a lot of slow-rolling and stop-and-go riding. When it comes to handling, electric motorcycles are able to have an optimized center of gravity. The Livewire has a rigid aluminum frame and premium adjustable suspension, other reviewers who have test ridden machine are usually relatively impressed with handling, not exceptional, but good.
Range Anxiety?
This is where all electric motorcycles get the hard time. The Livewire is said to have 146 miles (235 km) of city range or 95 miles (152 km) of combined, so this is really a machine for the urban street-rider. That’s not too bad as some petrol tank range figures would be similar.
So what about charging time?
DC Fast Charge (DCFC) technology provides a 0-80 percent of battery charge in 40 minutes or 0-100 percent charge in 60 minutes. This is the current real issue with electric motorcycles – filling your petrol take takes 2 minutes while filling your electric battery takes 40 minutes, and while there is a lot more electric charging points available , at the moment in 2019 / 2020 we simply have a lot more petrol stations. Driving an electric car / riding an electric motorcycle requires some planning! (Though…on the other hand … there’s no engine oil to change, and no spark plugs, air filter or primary drive system to service!)
Electrical systems include
Cornering Enhanced Anti-lock Braking System (C-ABS),
Cornering Enhanced Traction Control System (C-TCS)
Drag-Torque Slip Control System (DSCS)
A 4.3-inch color TFT touchscreen
Seven selectable Ride Modes electronically control the performance characteristics
The LiveWire motorcycle will be available in 2019 and 2020 through select authorized Harley-Davidson dealerships in the United States, Canada and most European countries where Harley-Davidson conducts business, with expanding global availability planned for 2020 through 2021. LiveWire MSRP around $29,799 but for full details obviously see the Harley website!
Like a loaf of bread, the baker wants to provide you with food that tastes good for about 3 -5 days or so..it’s the same with tires, they last longer than 5 days, but they do have a shelf life! (Please do not try eating your motorcycle tires).
It doesn’t happen quickly, but tires degrade and decompose over time! Simply, as a tire gets older, the rubber loses its softness through natural chemical changes.
Before we continue…there is some common sense needed when it comes to tire age. Let us say your motorcycle mechanic has put new tires on your motorbike and you check those tire numbers out (see how to read tire age below). To your horror, you discover they are already just over a year old! (I’ve heard of people getting super upset about this.. ) There is no need to refuse a 1 year old tire, it is still new. In reality it is almost certain you will be replacing those tires long before they get too ‘old’.
The average manufacturer, usually recommend that a tire performs optimally before it is 5-6 years old. But how long does it take to ‘wear out’ under average riding conditions?
Let us just say an ‘average’ motorcycle tire might last (with regards to tire tread) for between 2500 and 7500 miles of riding. (This will depend on a whole host of factors including, riding style, motorcycle type, the type of tyre you choose (soft sporty tires vs harder touring tires) and lots of other things)
Some of the riders I know ride about 2500 (casual hobby non commuter types) while other who commute ride well over +10,000 per year. Let us take those guys on the low end of the spectrum (riding just 2.5k miles per year) could well be needing replacements after just 2 years of riding! (Long before age will be a factor at all). [Just to be clear, as I said above, there are many dozens of other factors that determine the speed of tire wear, aside from just the mileage you cover, but I’m just trying to present a simplified example.]
What is important is that you inspect your tires for tread depth, uneven wear, squaring off, colour degrading, ballooning, scalloping, cracking & of course pressure. A thirty seconds visual inspection before you set off could be a life saver. (NB if your inspection reveals the tell tale signs of a puncture repair – get the tire replaced. Do not ride on a temporary puncture plug; while these puncture repairplug kits are excellent, they are designed to get you home safely, not for another 5000 miles averaging 100mph.)
Most tires have tread depth markers in the rubber, but it’s still a good idea to use a tire tread checkerat least once a month and be sure.
Aside from wear, there are lots of factors that can make a tire rubber degrade more quickly too. Higher standing temperatures in your country can accelerate degradation, or, whether you store your bike in direct sunlight or not – direct sunlight can chemically alter your tire making it age faster. Review your tire for subtle changes in colour especially if you store your tire outside (use the quick thumb nail test below regularly). Consider usinga bike cover when storing it outside even though it’s dry, it can keep the sun off as well as the rain!
A quick check on the quality of your rubber is the thumbnail check – if you can’t get your thumbnail pressed into the tire at all – get it down to your mechanic and get new rubber. (You need to press your nail into the rubber relatively hard – it’s not a sponge). You are just looking for the rubber to allow you to press your nail into it a little, and for the rubber to ‘bounce back’ from your little nail indent very shortly after your thumb nail is removed.
So how do you tell what the date of manufacture is?
Look on the outer sidewall for the acronym “DOT,” which should be followed by a series of numbers. The last four digits are what you need to determine when the tire was manufactured. The first two numbers represent the week, and the second pair indicates the year. For example, a tire with the digits 2510 was made in the 25th week of 2010.
As a rule of thumb on age – we suggest tyres should be replaced after 6 years , regardless of how many miles they have done. After 10 years they could be so hard, they may be hazardous.
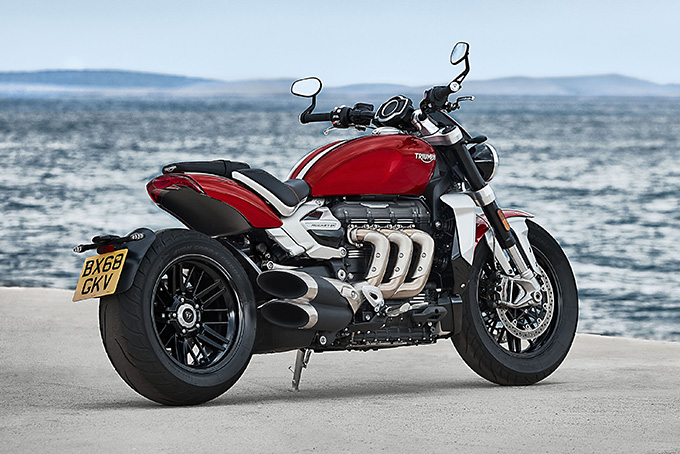
The Triumph Rocket 3 has an all-new 2,500cc triple engine – the world’s largest production motorcycle powerplant, and produces an “arm ripping” 221Nm of peak torque, which is the highest on any production motorcycle. (Correct at the time of writing!) This is great, but does it ride like a Triumph or turn like an oil tanker?
The answer is..this is Triumphant magic. What Triumph have engineered can be best described as “a breathtaking contradiction”.
On one hand, this beast has an immense scale and presence : a glorious mountain of raw machinery with the looks of a bruising custom hot rod. On the other hand, the team at Hinckley England have engineered (relatively!) agile handling, a comfortable ride, a smooth power delivery, all delivered through a new frame and suspension that belies this machine’s gargantuan proportions and prodigious power-plant. This all equals cornering confidence that you should not have on a machine this size, but even more important it gives the rider a ‘smile factor’ that test riders are reporting as incredible.
One of the best professional reviews I have had the pleasure of watching is from the guys at the 44 Teeth YouTube Channel – those burnouts on tap without even breaking a sweat : literally laughter inducing insane levels of power.
There is a consistent thought and feeling coming across from the motorcycle press on this machine, “a power cruiser that really handles”. It is a machine that WILL put a smile on your face. Which in my opinion, is what any motorcycle should do. The Ducati Diavel is the only real top line direct competitor in this small sector of ‘power cruisers’ but most reviewers come away suggesting this Triumph beats it, which is jaw dropping.
ENGINE
2,500cc Rocket 3 triple engine
167PS peak power @ 6,000rpm
221Nm peak torque @ 4,000rpm
18Kg mass savings over the previous generation engine
Beautiful hydroformed three-header exhaust run
Incredible acceleration (2.79 sec 0-60mph)
TECH
Optimised cornering ABS & traction control
Four riding modes (Road, Rain, Sport and Rider-Configurable modes)
All LED lighting with distinctive DRL
Hill hold control
Cruise control
There are two models to choose from the Rocket 3 R and Rocket 3 GT. The R has roadster-style handlebars while the GT’s are more touring-oriented. You’ll have a 750mm seat height on the R, while the GT is 773mm , but the GT has a foot peg position which is more forward. Both machines have adjustable pegs, but with two vertical options on the R and three horizontal positions on the GT.
At Smart Motorcycling Guide we encourage all weather, all year round riding. You can ride your motorcycle through the winter, protect it with anti corrosives, wash it well, clean and dry it thoroughly and continue to make sure your chain is well protected. BUT we appreciate that wet and cold weather riding is not for everyone.
Even if you do plan to ride your bike through the colder weather, the article below still provides some good advice for the other times when short term storage is still needed.
Nah,too much work .. I just want to park it.
The good news is that proper storage shouldn’t take more than a few hours of work..not a massive investment of time to be sure that your motorcycle will remain in tip-top condition in terms of looks, mechanical condition and trouble free future riding.
Fuel for a “stable” relationship
On carbureted bikes, drain the carbs , fill the tank filled with stabilized fuel. Start by turning off the fuel line at the tank tap (petcock) , unscrew the drains at the bottom of the carb float bowls and drain them out (this is a good chance to check that your carbs are clean, the drained fuel should have no specks or rust, dirt or grime. If it does, time for a carb clean). With the fuel line still turned off at the tank side, run the bike until it dies (to suck the rest out of the carbs). Mix in your stabiliser in the tank You are aiming for a full tank as far as possible, but no need for it to be so full that it is squirting out when you close the filler cap. (If you can’t drain your carbs for some reason, just run the stabilized fuel through the system by letting the bike warm up for 5 mins).
Fuel-injected? Same as above, but no carbs to worry about. Fill that tank, add stabilizer, run it through the machine for 5 mins or so. Done.
Each stabilizer manufacturer will tell you how much to use, how long the fuel is usable when treated, read the instructions. Just buy some and use it guys.
Get your motor running, but no need to get out on the highway.
Unless you’ve got a temperature and moisture controlled Garage .. you will always have some condensation to worry about..this can cause rot from the inside out, so it is always a good idea to start the bike and give it a good warm up every few weeks. You don’t have to take it out of your garage, but open the garage door so that fumes can escape, and let it warm up for a good 10 minutes. Remember to allow the bike to cool before re-applying corrosion protection and covering it up again.
Keep it clean gentlemen
Next be sure and clean you motorcycle thoroughly. Use a good automotive washing agent to get rid of all that grime that collected over the past several months. Grime can hide and harbor damp..damp leads to rust. After washing make sure that your bike is completely dry. If you have compressed air available, use it. If you’ve no compressed air – this motorcycle dryer is a really fantastic alternative, which I use myself!
Lube me up
Re-lubricate the motorcycle; check any pivoting joints and your chain. I use chain lube for almost everything needing some lubrication on the motorcycle. It’s not corrosive to rubbers and plastics and usually good enough for most moving parts and surfaces. Finally, we highly recommend the use of an anti corrosion treatment – ACF50 is amazing stuff, messy, but amazing. (This is some seriously slippy juice – DO NOT get it near your brakes or tires, cover them up before using this stuff)
Wax on Wax off
Use a good wax to coat and polish the surfaces. Again, avoid the brakes.
Get the tires up and off of the ground. If you have a center stand, great. If not, invest in a pair of stands to get the bike up (you’re reliving the suspension). They will pay for themselves numerous times over.
Take a Power nap
Save yourself the grief of needing a new battery come spring by using a battery tender. Like getting the tires up, this investment will pay for itself over and over again.
These are just a few ideas to keep your bike in great shape when not being ridden for an extended period. A small amount of time and investment will result in a huge time and money savings later.
Harley-Davidson’s® First Adventure Streetfighter Models Debut with All-New Revolution® Max Engines
Does this New Model Beckon a New Era from Harley-Davidson?
The iconic brand is branching out into new market segments! For some of us because this is not covered in awesome chrome and maybe not loud enough to demolish buildings… it is not a true Harley. Instead it is a very ‘challenging’ proposition..simply..this is not the Harley we know and love. For others, including us, we think this is fantastic! More Harely-Davidson’s in the world is a great thing! We love Harley-Davidson, so lets see the brand spread those iconic wings so we can see more of them!
Displayed for the first time publicly at EICMA in Milan late 2019, Harley-Davidson® showcased their 975cc in the Harley-Davidson® Bronx™. Look at it !
TheBronx™
A new power-train is at the heart the new Bronx. This middleweight street-fighter model has a real attitude and hopefully performance to match. It looks, stocky , purposeful, chunky and mean.
But the proof of how good this machine will be, will be in the riding of it : how will it handle, what will the price be & will it weigh as much as other Harley’s normally do!?
Harley plan to power it with on their new new liquid-cooled 975cc, Revolution® Max engines.
Revolution® Max 975 Engine Performance
Targets
Displacement 975cc
More than 115 horsepower
More than 70 ft. lbs. peak
torque
For braking, Harley-Davidson® collaborated with Brembo® to create a new radial monoblock four-piston caliper – that is fantastic stopping power.
Look out for more exciting news on Harley Davidson soon here at SmartMotorcyclingGuide! – have you heard about the new electric Harley?!
This article was written to ENCOURAGE motorcyclists to get out there in the rain!
Like any experienced lover motorcycle rider, you should know that being too aggressive is often a quick way to getting a black eye or a broken arm, instead the best results are usually achieved from being smooth and gentle. The best lovers riders, will take their time. Always ensure that things are are warmed up properly (your tyres), especially in ‘wet’ and slippery conditions.
Yes, there is definitely a time and place to be a fast passionate lover rider, where you can be really vigorous (with the throttle) and aggressive (on the brakes). This is often when you take a special trip away from home. (What I’m obviously saying is that Track Day performances, belong on the track – where you have the proper protection, no traffic coming the other direction, gravel traps for when you don’t judge that corner just right and you’ll have a full race suit on.)
‘Feathering’ the Throttle.
Be gentle on the throttle: rain reduces the friction coefficient you have to work with between your tyres and the road. Your aim is to apply your acceleration force GENTLY, keep the force you apply as you accelerate, progressively even, consistent and smooth (a higher ‘shock’ force is generated if you ‘snap’ the throttle quickly open – the tyre can break loose by exceeding the available grip and your wheel will spin). If you spin the rear tyre, just try not to panic, remember you are a smooth and gentle rider. If you are lucky enough to be still upright, try to ‘ride it out’ , let your machine come back to a straight line, then GENTLY come back off the gas, no sharp corrective turning, no sharp braking.
The only real way to prepare for the feeling of the rear ‘letting go’ or ‘stepping out/spinning up’ is to get some experience of it actually happening! Book yourself into an advanced rider course, or take a blast on a dirt bike and purposefully get that tail slipping around. Consider enrolling in a stunt program and get some rolling burnout hooliganism under your belt, in the name of safety! Remember you want to be as familiar with this drifting ‘feeling’ so that when it happens unexpectedly, you will be better placed with some muscle memory to know naturally what to do.
If you have traction control settings or rider modes, please use them! You are not going to impress anyone in the hospital emergency room by letting them know that you have balls SO large, that you NEVER use rain mode.
A Gentleman never ‘grabs’ (the brakes)!
Even those of you with ABS please do apply the following techniques. You have ABS as a final protective measure, it is designed to help prevent lock-up in those situations where at the last minute you have had to hit the brakes hard, unexpectedly. (Yes track riders will be pushing up against the limits of ABS, but we’re talking reasonable (wet) road riding here.) The way you should be braking in rain..you guessed it.. ‘gentle and smooth’. Plan your braking even further ahead verus when riding on dry roads, consider the extra time you need to gently bring your machine to a stop. Imagine you have a glass of water balanced on your handle bars…you should be braking so smoothly and gently that you’re not going to spill a drop.
Respect Road markings.
A massive white arrow painted on the road – or a line in the middle of the road will both present you an area that is more slippery than that the rest of the asphalt. Your best option is to plan your line to avoid these markings (defensive riding) otherwise, imagine those markings are like an oil slick, or ice. This means basically no braking while on top of them, only mildest steering input, and the application of a flat/even throttle (or even rolling off the throttle).
Corner gently BUT deliberately.
Your bike’s geometry behaves essentially in the same way in the wet as it does it in the dry. Drive through corners in the same even and deliberate way as you would in the dry; but aim to maximise your gentleness & smoothness as turn and transition. Plan your corner knowing it is best to have a decreased overall cornering speed versus what you would plan in dry conditions. As you are coming into the corner with gentle/smooth braking applied, plan a smooth gentle line through. As you reach the point where you are beginning to ‘roll on’ again, do so, but gently, this is loading your rear tyre evenly and still working weight onto the rear suspension which helps keep your bike settled and stable as you drive deliberately but gently out of the turn. No ‘coasting’ guys, you are asking for trouble.
What about Tire’s
The key is having a tire with a tread pattern made to slice through and disperse water, this helps avoid aquaplaning and will keep your rubber planted on the road! There are a number of fantastic all round touring tires than are not just good wet , but are fantastic for everyday use , touring, and a back road blast on the twists. We recommend The Michelin Pilot Road series, a fantastic wet tire and a great all rounder.
Tire pressure is a contentious issue, some riders will recommend a slight increase in PSI, others a slight decrease..we recommend that you keep your pressures in line with the manufacturer’s guidelines for the bike and the weight you riding with. On the streets, it’s not worth changing the tire pressures outside the manufacturer’s guidelines just to suit riding conditions.
Helmet considerations for the riding in the rain?
Firstly, if you can, get a pin-lock system onto your visor to prevent fogging, really does a fantastic job. We also found this fantastic device that attached to a finger on your glove – a mini wind-shield wiper blade!
Motorcycle Clothing for wet weather riding?
Firstly, protecting your body from rain and cold will make you feel much more comfortable on the bike, and as I’ve mentioned in my post about Cold Hands – being distraction is super important.
If it’s raining, you are even less visible – rain decreases visibility (not just for you but for all other road users) Swallow your pride guys, seek out rain gear that has reflective elements. Some of the best examples of wet we have found include: please follow the links to have a more detailed look, get yourself properly kitted out now.